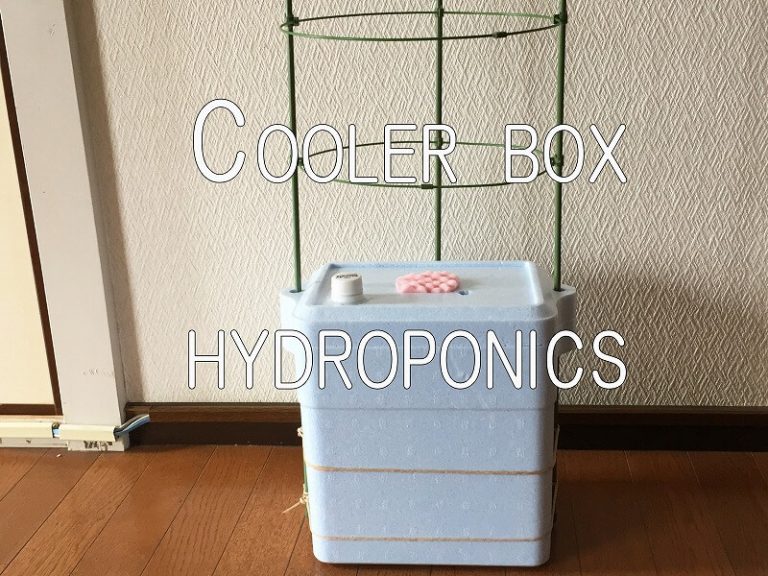
Cooler box hydroponic culture
A container for hydroponic culture.
I tried to make it possible to buy at Daiso (One Dollar shop). Please change the capacity of Styrofoam depending on the growing plant. (* ^ ▽ ^ *)
What you prepared
★ Cooler box (It is sold at Daiso (One Dollar shop). It was 300 yen.)
★ Scissors, ★ Epoxy adhesive ★ Sponge ★ Ring support (for 75cm) ★ Water absorption port of plastic bottle ★ Oil-based pen
★ Handagot ★ Air Stone and Tube ★ Pimp
(All are sold at Daiso (One Dollar shop) etc.)
★ Air pump
Notes
★ When making a hole in the water inlet of the plastic bottle, make sure to check the back cover and make a hole inside.
★ Sponge part to put vegetables in the central part
★ The place to put the air stone is just under the root.
Future Improvements
★ I want to make the sound of the air pump quieter.
(※Japanese is translated into English by translation software. I am sorry if it is strange English.)
Making hydroponics self-made improved forms
Make an improved hydroponic culture box. (`・ω・´) 
The things you prepared are
1. Cooler box (300 yen size was prepared this time. Please change the size depending on the growing plant.)
2. Ring post (if it is 75 cm in diameter, it fits perfectly with the size of the cooler box)
3. Water inlet of plastic bottle (We cut off part of water inlet of plastic bottle and use.)
4. Air stone and air tube (Please adjust the length of the tube depending on the place of the air pump.)
5. Epoxy adhesive (selected by waterproof function and adhesive strength)
6. Scissors
7. Sponge (squeeze vegetables here)
8. Oil-based pen (I used to mark it.
9. Pimp (I used to fix the pillars, even vinyl straps are acceptable)
10. Air pump (depends on the size of the vegetables to be grown, but usually it is not necessary to have such a large size)
11. Soldering iron (Used for drilling holes in polystyrene foam. If used, be aware of fire and use at your own risk.)
(All except the air pump, air stone and air tube were bought from Daiso (One Dollar shop))
We have prepared .(`・ω・´)
First of all,

Prepare only the water inlet of the plastic bottle.
(I cut it off with a soldering iron this time, but I think it will break even if it looks like a saw.)

Because you make holes at 1, 2, 3, and 3, mark it first.
1 is the hole through which the airstone tube passes,
2 is a hole to put a plant between sponges,
3 is a hole to put the fertilizer water.
(3 is used to mark the plastic bottle inlet)
※ Note ↓

The back cover of the 3 plastic bottle water inlet.
When a hole is drilled, it is drilled so that the hole opens inside.

If you open a hole,
Put the plastic bottle's water absorption port in part 1 and put the epoxy adhesive in the space around it and harden it.
Put the sponge in part 2 and cut it about 1 cm in height and width than the hole you opened.

Insert the epoxy adhesive around the plastic bottle water absorption port with such a feeling and fix it.
(As we want to prevent evaporation of water as much as possible, we put epoxy adhesive to fill the gap.)

The sponge is cut a little too large.
The sponge is cut to the middle.
(for putting in a hydroponic culture box sandwiching vegetables)
It's like this. (^◇^)

I put on a sponge. (^◇^)

Put the column where the strap of the cooler box passes.
(I think that you don't have to put the support by growing vegetables,
Since the vegetables of hydroponic culture grow more than expected, I think that it is safer to have attached from the beginning to the vegetables whose height is extended. )

I installed it.
Please attach the support firmly.
(do not bend or fall in the wind)

Fasten the support with straps and stop.
(This time I tied in two places, but please try to tie in three places, four places if you think that you can not fix firmly.)

The other columns were tied around the entire turn from the first turn.

It will be completed if you can fix it like this. (^◇^)
( ※ Wrapping the exterior with aluminum foil can cut off the sunlight, so you may lose energy in summer ,
If you have green moss, try it

Insert the tube from the hole for air stone and install the air stone.
(Please place the airstone directly under the root)
( Water flow and oxygen promote vegetable growth )

Finally, connect it to the air pump.
(^◇^)
(Pour the fertilizer water up to the full container.)
I saw videos on how to make basic soil cultivation.
(;^ω^)Sorry for the Japanese subtitles
(※Japanese is translated into English by translation software.
I am sorry if it is strange English.)
Related posts:
No related posts.
